Step 0: Set up a git repository with your favorite git client. (Doin this now saves you a lot of trouble later)
Stage 1: Guide to basic mapping elements.
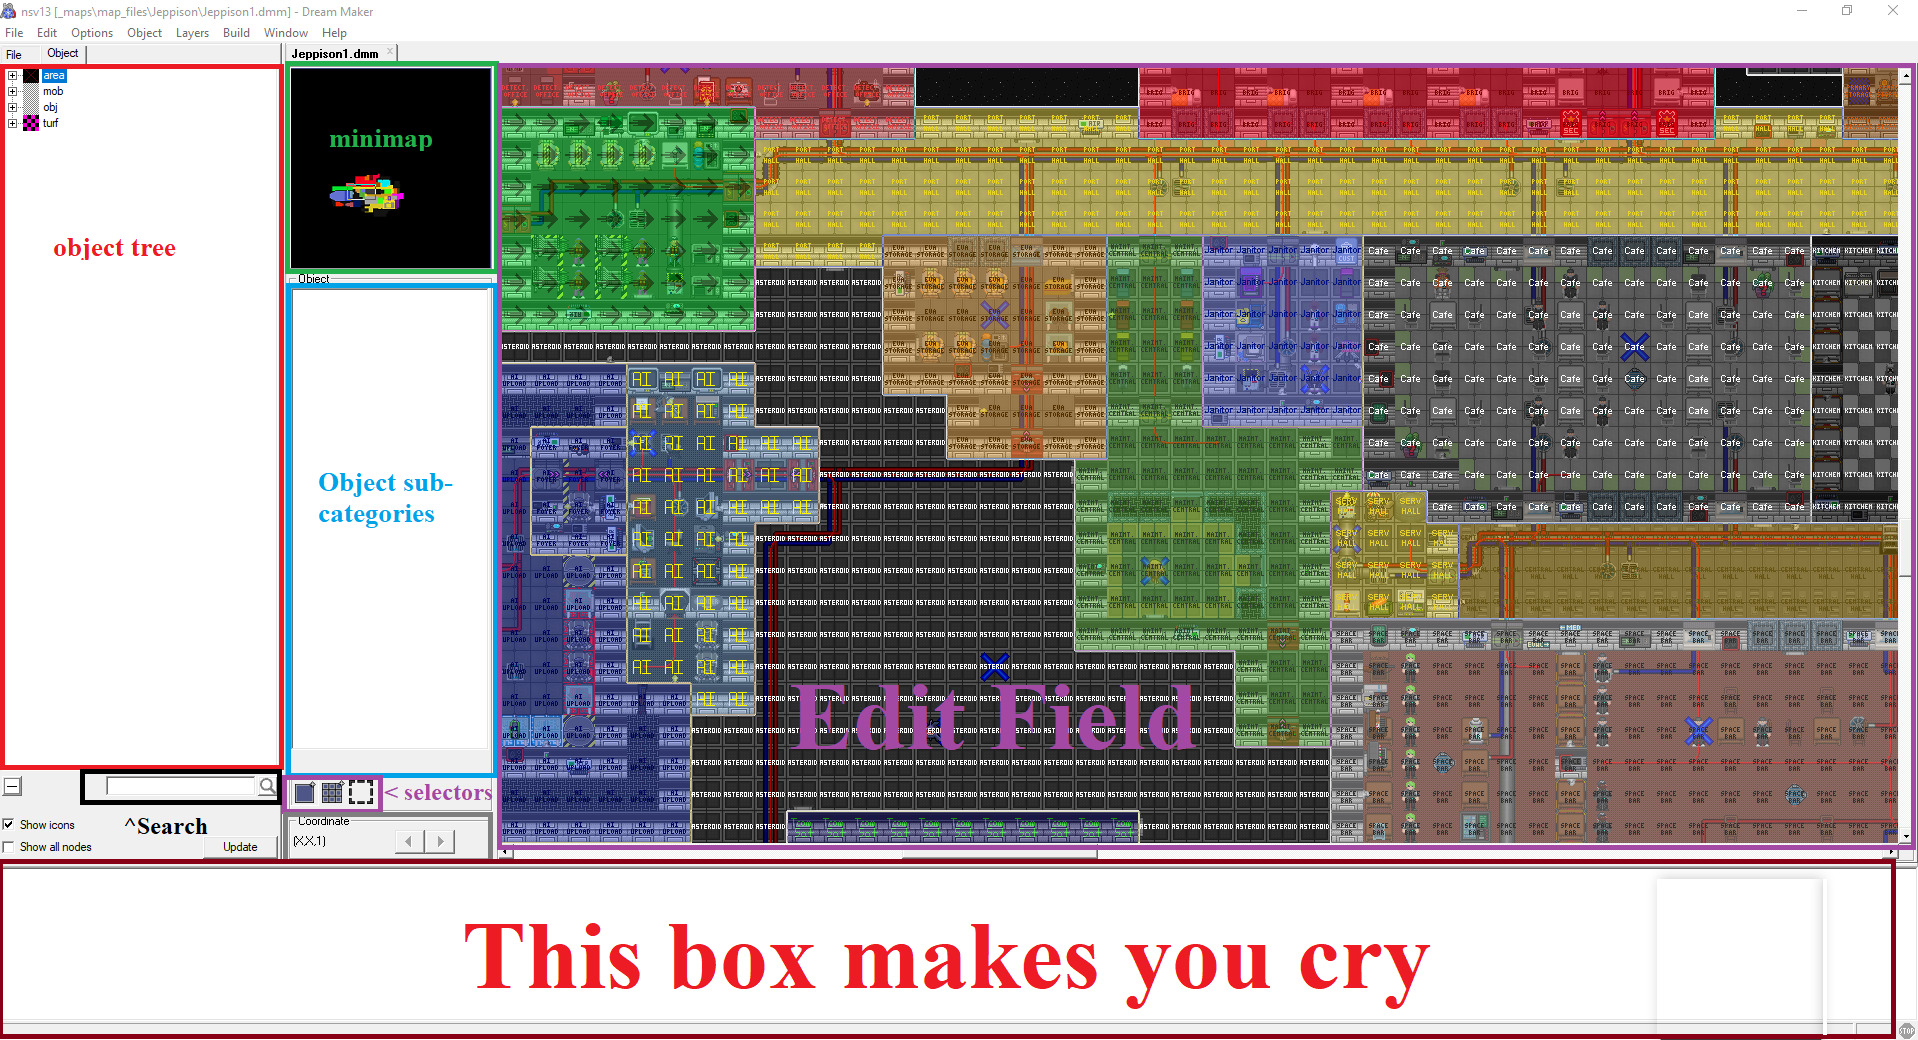
Step 1 - The program: Open the .dmm for the map you want to make in dreammaker (or your preferred mapping client. For this guide we’ll use the basic dreammaker client), this should be the default program.
Step 2 - Patience: wait about 20 years for the object tree to populate.
Step 3 - Definitions: Now, once you have your .dmm open and the object tree is generated there are a few different things that are important to note. First is the area over on the left, that has all of the object paths collapsed into their parents.
Areas: Define things like air alarms, scrubber areas, APC power, gravity, etcetera.
Mobs: Things like people, swarmers, drones, aliens, things like that are here.
Obj: Aka objects, these are the things that make up about 90% of the game. Things like machines, lockers etc.
Turfs: These are the things that make up floors and walls. There are two subtypes you need to worry about, open and closed. Open you can stand on, closed you can not.
Step 4 - Breaking Down Step 3
Now, focusing in a little bit more on objects. You’ll note there are a lot of categories in objects.
Effects: Include things like turf decals, colored corners, warning stripes, blood patterns, gib spawners, people spawners, things like that.
Item: Things you can hold in your hand in game with a few exceptions. Wall mounted radios are under the item path.
Machinery: Anything that draws power from the APCs. Computers, cloners, atmospherics machinery, engines, all that is here.
Structures: Things that don’t draw power that can’t be held in your hand. This is where you find tables, lockers, windows, etc…
We’re going to briefly talk about turfs. Here’s the rundown.
Closed Turfs: Things you can not walk through. This list primarily includes the following: Walls.
Open Turfs: Things that are passable by people or items that fly or walk. This includes your plating, space, lava, etc…
Note: If it’s indestructible it’s just that, it can not be destroyed. These are reserved for
Step 5: - More Layout Things: Generally if you know the object path you can find the item you want through the search bar below the object tree. If you don’t know what the path is but you know where it is on a station you can go to the file tab next to the object tab and open the .dmm of the map that has it, go find the item, and then you can right click to find the path.
Now, just to the right of the object tree is another column. At the top there is a small black box, this is a minimap that shows the overall z level that you’re looking at. You can click on this to quickly move your view around the map.
Below that minimap is a white field with the word object at the top of it. Below this is where all the sub-categories of the specific object are. Base objects will be first, then below that will be those that have edited variables. You can double click on those with edited variables to quickly see their variables. Any that have been changed will be bold.
Below that field there are three buttons. One square, a field of nine squares, and a dotted outline of a square. From left to right these are…
-Individual placement tool: Makes a change to one tile and you can click and drag it with your mouse to make the same change along multiple tiles according to the path of your mouse.
-Area placement tool: Similar to individual, only area based. You’ll click and drag to effect every tile that is outlined.
-Selector tool: This is basically like the select tool from MS paint. Click and drag over the area you want to select, then you can click and drag it around, copy, delete, or whatever.
Notes on copy-pasta
If you paste something it originates either from the bottom left corner of the edit window OR the mouse cursor. If you paste once, update the position of the courser if you want to do it again.
Below that, coordinates box, it gives you your x, y, and z coordinate on the .dmm. The arrows next to it are intended for you to go up or down z levels, we won’t touch multi-z though since that’s probably out of scope.
Step 6 - Placing Things: Right, anyways, dreammaker has this annoying thing where if you place an object on top of another object by default (just clicking on it) it will delete the other objects on that turf. To avoid this, hold down CTRL and then click.
Note on var-editing: Don’t touch step x or step y. If you make any pixel changes do not change them to “0”, this causes problems in the mapping checks.
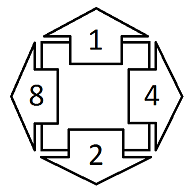
Var Direction Template. Directions are defined by the below picture. If you need a diagonal add the two cardinal directions together. So if you need northeast that would be 5.
Step 7 - Compiling : Remember when I put that big nice picture of dreammaker up there with that “This box makes you cry” thing in it? This is where that comes in to play. When you compile the code to make sure everything works “properly” enough to test it in a live instance of the code. If you have any major errors they’ll show up in that crying box.
Step 8 - Running the Code: The final step is testing. You need to be able to test your product before you put out a pull request. The first step has already been done, you compiled the code and thank god it worked. Next up? Open Dream Daemon through byond (you can also use the “compile and run” feature. Make sure you set the security option at the bottom middle from “safe” to “trusted.” No, this won’t broadcast your favorite Cayman Islands account number to the world, it just makes it so you don’t have to click through about 5.6 million acceptance of risk messages. Then, select the .dme file for the appropriate code base and press that little green “Go” button. After that you’re done, you’re running the code! As time passes I’ll come back and be updating this guide with common troubleshooting tips and FAQs. If you have quesions feel free to post them in the threat, but keep them generic, this is supposed to be a general guide to mapping! It’s not meant for the specifics.
Stage 2: Github…
Step 1: Map merger. You know that local directory of everything for the project that your git repository keeps? Yeah, we’re going there. Find the directory [project]/tools/mapmerger2/ After that you’re going to run mapmerger.bat. Find the map that you’re editing, enter that number, hit enter until it merges.
Step 2: Hopefully you’ve been operating in a separate branch and not your master, it just keeps things cleaner in the long run. Either way, what you’re going to want to do is make a commit, then push that to the branch that you’ve been working on.
Step 3: Make a pull request and follow the format. There are a few key things to help. Pictures, a description of what you did, and an explanation of why what you’re doing is helpful to wherever you’re changing. For example, if you’re moving a stasis bed in medical then it’s not a bad idea to say that it helps reduce the number of times doctors get shoved out of the way during surgery. Changelogs: These are very basic. They are the esentials that players need to know in order to keep fully up to speed without being a subject matter expert. So, if you move a stasis bed a few tiles, not a big deal. If you add a whole new room? Maybe a little bit bigger of a deal.
Step 4: Do what the maintainers suggest. This helps ease the struggle of getting your PR merged. Listening to the peanut gallery can also help, but use common sense. Don’t go outside of the scope of your PR.
Step 5: Pray to the eldrich gods that travis blesses you with a green check mark.